something you'll have to do too often, however if you find yourself
in a situation where you need to playblast something yourself, here
are some tips that may help with it.
Setting up the scene
To begin with, let's get the scene prepped for playblasting. I like
to start by adding in the shot mask to my animation (mostly because
I have a tendency to forget if I wait till later :p). AM already
has a fantastic video on setting it up so I'll just link to that
and move along.
Setting Up the Shot Mask
Next, to clean up your shot and make it easier for your mentor to
analyze your work, I would suggest hiding the grid and creating a
ground plane for your ball to bounce on. You can hide the grid by
simply going to the viewport and selecting "Show > Grid". As for
the ground plane, I find the simplest thing to do is to use a
polygon cube. Go to "Create > Polygon Primitives" make sure
"Interactive Creation" is unchecked and select Cube. A handy tidbit
I like is once the cube is scaled to the size you need
for your ground plane, set it's Translate Y to negative half of
it's Scale Y value to have the top line up perfectly with the
zero-ed out value of the bouncing ball. For example, if your have a
Scale Y value of 5, set your Translate Y value to -2.5.
Now on to the most important step: making sure your shot is framed
up how you like it. In your main viewport, go to "View > Camera
Settings > Resolution Gate". There should now be a frame in the
viewport showing exactly what will be in your playblast. It will
also give the resolution of the shot which should be 640x480 by default.
Next, go under "Window > Rendering Editors > Render Settings",
find the Image Size section near the bottom and set the Width to 720
and Height to 40.
If the top and bottom of the resolution gate are cut off by the
viewport, go to "Panels > Tear Off Copy..." allowing you to freely
change the size of the window until the entire frame is in view. You
will now be able to scrub through the timeline and make sure
everything is framed up perfectly. Just be sure to turn the
resolution gate off again before playblasting.
Side tip: When framing up your shot, try to avoid having the ball's
starting position halfway into the shot. It gives an odd pop to the
animation as it begins. Instead, try to have the ball start either
completly on or off screen.
The final step for the setup is hiding all the control curves in
the shot. This can be done by simply going to "Show > NURBS Curves"
in the viewport or by hitting the button in the arAnimTools shelf
that looks like an eye with the word VIZ underneath it.
Playblast Settings
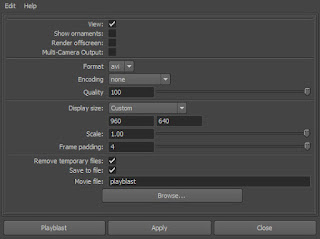
Now that the scene is ready, let's get to the playblast settings by
right clicking on the timeline and selecting the Options box beside
Playblast.

The image above is the settings I use for my playblasts. The dimensions are
a bit out of date as this was done for the old critique tool, however the other
settings are all the same. Having"View" checked is nice as it makes Maya open
up the video file onceit's done playblasting. I also like to make sure that
"Show Ornaments" is turned off as this will remove the camera name and
global axis from the playblast making the shot a little cleaner.
Some mentors might prefer to have the axis in the corner, so be
sure to ask.
Now for the filetype. I prefer to have it set to avi. You can also
set avi files to open in Quicktime by default which will help
streamline the process of exporting the video later on. To do that,
find an .avi file on your computer, right click on it and select
"Open with > Choose Default Program". Choose Quicktime Player. If
it's not on the list, browse to it's location, which in Windows 7
should be "C:\Program Files (x86)\QuickTime\QuickTimePlayer.exe".
Make sure "Always use the selected program" is checked and hit Ok.
Mac users don't have to worry about any of that as you can set the format to mov. (Lucky...)
Also don't forget to set the Scale to 1.00 and frame
padding to 4.
Finally, select where to save the file and get playblasting!
(whew... I'm pretty long winded aren't I?)
Quicktime
We're nearly there! The playblast should now be open in Quicktime
and ready to be exported out for upload! Just follow along with the
video standardization which you can find here:
Support.Video Standardization
One thing to keep in mind is you no longer need to add the transition
blank file to the end of your shots..
Thank you very much for reading and I hope it helps you. Have a
great week 3 and have fun animating!

No comments:
Post a Comment