Well, we finally got our audio clip but the journey isn't over yet. It is now time to start editing your audio clip. If you're lucky and the clip you have is just how you like it, then all that's left to do is export the file to a .wav format and compile it for upload to AM. Or it could be that you just need to trim a bit off the start or end, which you can easily do in Quicktime. But if you're not quite so lucky, you may need to edit certain aspects of your clip. For example, it may be over the frame limit so you have to cut out certain lines, or perhaps the background music is too apparent and you'd like to tone it down. This is when it's time to pull out your trusty audio editor and start getting your hands dirty.
For the purpose of this demo, I'll be using Audacity, which is a great program that is both Mac and PC compatible and also totally free. You can use whatever program you feel most comfortable with though, as they almost all have the same functions.
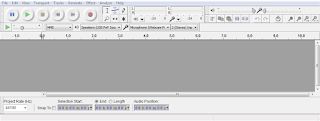
Before we begin, let's familiarize ourselves with the Audacity interface. It may seem pretty complicated at first glance, but if you take the time to go over all the controls, you'll find that it's actually fairly simple.
If you check out the following link, there is a layout image that goes over all the different interface controls which is really helpful as it will make it easier to find what you need.
Audacity Manual
Removing Sections

The most common editing you'll probably be doing is removing parts of your audio clip. Whether it be trimming the clip to a good length, removing pauses that are way too long, cutting out unnecessary lines, or just getting your clip to fit into the frame limit, it's all the same easy process. With the "Selection Tool" (see above image) active, simply click and drag over the waveform to select the offending section and hit the Delete key. Simple as pie. (I hope that expression means eating pie, because baking it is a pain!) Just be sure to double check the cut section as there may be audio pops which will mean trying to undo and refine your selection.
Adding Silence
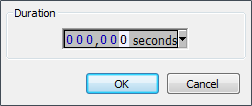
On the other hand, there are times where your audio clip may be just a hair short of the frame limit, or that adding a bit of a pause will make the line even better. In these cases, you can add a silence right into the clip by clicking on the area you want to lengthen and hitting "Generate > Silence". Now, the thing I love about Audacity is not only does it ask you what amount of time you want the silence to be, it also gives you the option of doing that in frames, which means you can add a silence that is exactly the length you need for the animation! To do that, just click on the arrow to get the drop down menu and select "film frames (24 fps)".
Removing Pops and Music
Most pops and clicks can be fairly easily removed by going to "Effects > Click Removal" and playing around with the Threshold and Spike Width. It may take a while to get the settings just right and it may not get rid of all the noises, but it's a good place to start.
Music on the other hand requires a bit more finesse. Before beginning, there is a very important criteria that has to be met. What you need is a section of the clip that only has the music playing, without any voices. The longer the section the better, although even a short clip will help. Now, select the section that only has the music and under Effects, select "Noise Removal". In the Noise Removal window, begin with Step 1 by hitting the "Get Noise Profile" which will grab the section of your audio clip you had selected and use it to figure out what noises to remove. Next, select the entire audio clip, or just the section where the music starts playing, and go back to "Effects > Noise Removal" where we'll move on to Step 2. This part is a bit tricky as there are no key settings I can give that will perfectly clear the music. It basically boils down to playing around with the settings, mostly "Noise reduction (db)", and hitting the Preview button often to make sure you're getting the results you need.
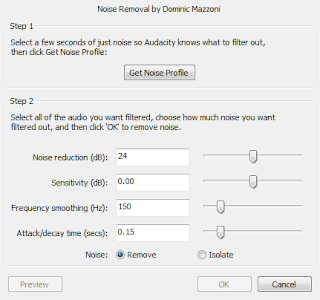
You can also use this same method to remove more stubborn pops and noises as long as you have a section of the audio that only has the noise you need to remove. Just as a demo, here are some before and after images and audio clips from a clip that I removed the music from. It's far from perfect but when you're animating, it makes a huge difference when you don't have to listen to the music all the time.
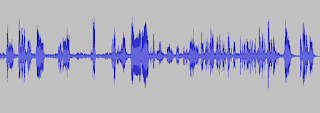
(Waveform before removing music)
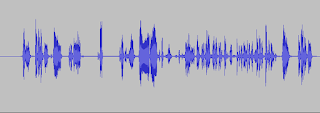
(Waveform after removing music and extra silence at beginning)
Before Clip
After Clip
Combining Two Clips
There may be times when you will need to take two audio clips and merge them together. It could be that you found one half of the clip you want in one place and the other somewhere else and need to combine them, or it could be due to some editing needs. For example, I needed to cut out a section from one of my clips but I couldn't figure out a way to do it by simply deleting the section without causing a very noticeable hiccup in the audio. In the end, I duplicated the audio track, overlaid them so that just before the unwanted audio began, the other clip started on the next good section. I then faded the first out just before the unwanted section and faded the other in so that there was no sudden silence in the audio. (Yes, that sounded extremely confusing and long winded but it worked! Bwahahaha!)

Back to the topic at hand, to combine audio clips, with one of your clips already open, all you need to do is go under "File > Import" and choose the the other clips you want to add to it. Then you can use the "Time Shift Tool" (see above image) to move the clips around and have them start at different times.
Equalize the Audio
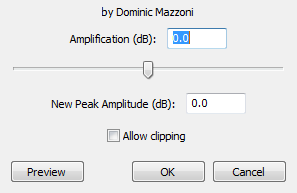
Getting audio from different sources comes with the risk that not all of them will have the same volume. While one could be so low that you need to crank up your speakers just to hear it, the next one might just be loud enough to blow out your eardrums if you forget to turn the speakers back down. To keep that from happening, and also keep unsuspecting fellow students from suffering from hearing loss, it's always a good idea to double check all your audio clips and make sure they are about the same volume. If they aren't you can easily change that in Audacity by selecting the entire clip, going to "Effect > Amplify" and either increasing or decreasing the decibel (dB) level till you reach an amount that matches the other clips you have.
Exporting
Once you've finished editing your audio to your heart's content, it's time to export. Simply go to "File > Export" and set it to "WAV (Microsoft) signed 16bit PCM" (this may be a bit different on Macs). With that out of the way, hit Save and you're ready to compile the clip into Quicktime and upload to AM!
I've only covered a few of the more common things you can do with Audacity but here are a lot more cool effects and tweaks to play with. If you'd like to play around with it more, here are some great links to check out;
Audacity Tutorials
Audacity Tips
With all this, you should be able to grab an audio clip from almost anywhere and get it ready to use in your assignment. I hope this was helpful to you and as always, feel free to contact us at anytime by Skype, pm, or comment if something was unclear or if you would like some help with something.

No comments:
Post a Comment