Online Audio Clips
To begin with, let's start with how to download clips from the Internet as it's the easiest and probably the most likely spot you'll be grabbing your clips from. As I'm a lazy writer, I'll point you to an article I wrote for class 2 that shows my favorite methods of saving videos and audio clips from sites like YouTube.
Class 2 - Week 3 - Reference Videos
Ripping Audio from Bluray or DVD
Getting your audio clip online is pretty simple, but trying to get it off a DVD or Bluray can be a tad trickier. To do this, there are two methods that I like to use. The first is recording the audio directly from my computer as the movie is playing, which I'll talk about a bit later. The second, and my preferred method, is to rip the entire section I need from the movie, video included, then extract the audio from that. This way I have the video clip if I need to reference something for the original acting or if I want to double check to make sure I'm not copying the original performance in any way.
The actual process of ripping a video clip is actually quite easy once you have all the programs. You'll need Handbrake or just QuickTime if the video file is already on your computer and is compatible with it.

While I could write a whole mess of step-by-step instructions on how to rip a movie or TV clip, I thought I'd save time (or just be even lazier) and post some links to a couple of tutorials that helped me learn how to do it.
How to Rip a DVD to your Computer
How to Rip DVDs with Handbrake
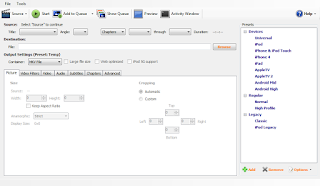
When I rip clips from movies, there are a few extra steps I like to take. Instead of fiddling around with all the video/audio settings, I prefer to select the "Universal" preset on the far right side. I find this gives a good overall quality as well as making movies faster to browse frame by frame.
I also prefer to set a time range to rip from instead of ripping the entire movie. This makes the ripping time much faster, which depending on your computer, could take over an hour if you do the entire movie. It also makes it easier to catalog and organize the different clips so I don't have to search through an entire movie to find the part I'm looking for.

To do this, you can input the chapters you would like to rip, or click on the chapters button and choose to set your selection by seconds or frames. I personally prefer "seconds" as any video player will tell you the current time of the movie and "chapters" can still be a bit too wide a selection at times. Just be sure you give yourself some padding before and after the clip you want to rip. That way you don't accidentally cut into it.
Once you have the clip ripped, all that's needed is to open it up in Quicktime, trim the clip so you only have the section of audio you want, and hit export.
To trim the clip, move the Quicktime timeslider to the start of the section and hit the "i" key to set the "in point" of the selection. Then move the timeslider to the end of the section you want and hit "o" to set the "out point". Once that's done, hit "Edit > Trim to Selection" to reduce the clip down to only the selection you want.
As for the export settings, use the "Sound to Wave option" to export a .wav file that can later be imported into Maya. For all the nitty gritty settings, take a look at the image below.
You can also use this method to convert most audio file types to .mov simply by opening it up in QuickTime and exporting it.
Recording System Audio
Sometimes there are scenarios where it's impossible to download the video or audio clip, or even rip a certain movie. For example, Netflix will block any attempt to download their files. Also, small scratches or imperfections on a DVD or Bluray can cause them to be unrip-able. In situations like these, you can turn to another method of getting the audio by recording it straight from your computer. Now I don't mean playing the audio through your speakers and recording from your microphone, which is possible but will typically have a much lower quality. Instead, you can use a program like Audacity to record the audio straight from your computer, keeping the quality as high as possible.
Now instead of writing it all down here, I'll just link you to the tutorial I used as it explains it far better then I ever could.
Recording System Audio
I hope this was helpful to you. These are just a few of my favorite ways of getting audio clips. There are many other ways of getting the audio you need for your assignments and as long as the quality is good and you can import it into Maya later, they are all good. As usual, if you have any comments or suggestions, please feel free to contact Cameron or me anytime either by PM, Comment, or Skype.

No comments:
Post a Comment