- Seeing how the face reacts even when the character turns away.
- The speed of the playback as you scrub through the scene can be excruciatingly slow depending on your computer due to all the objects in your shot, making it impossible to clearly scrub though the timeline and analyze your animation.
- If you have a character that moves around a lot, it can be extremely annoying and time wasting when you are zoomed right up to the face and every time you change frames, the character moves out of view.
Luckily creating a facial camera is a simple solution that can make things a bit easier. Here's how I usually go about creating one.
Creating a Facial Camera
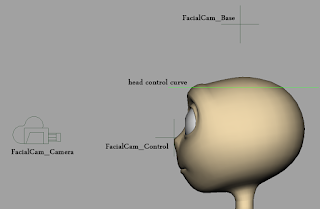
Create a locator by going to "Create > Locator". I'll be calling mine "facialCam_Base", but you can rename yours to whatever you like, then move it above Bishop's head. A Translate Y value of 32 for the locator should be all you need for default Bishop. Once it's in the position you want, make sure it's still selected and go to "Modify > Freeze Transformations" to set the current position to be the default. Finally, parent constrain the locator to the head control curve. As an added bonus, you can use this locator to track the arc of the head further down the road.
Create another locator, name it "facialCam_Control", place it in front of Bishop's face, around a Translate Y of 26 and Translate Z of 3.5 for default Bishop, freeze the transformations once it's placed, and parent this to the first locator, by selecting the child (second locator), then the parent (first locator) and hitting "p".
Finally we get to create the camera. (For a facial camera tutorial, it sure took long enough to get here :p) Create camera under "Create > Cameras > Camera" and position in front of Bishop's face so that his face is centered and framed in the new cameras viewport. To make it easier to position, with the camera selected, you can hit "Panels > Look Through Selected Camera" to look through the camera lens. I find that a Ty of 26 and Tz of 14 work well for default Bishop. Once you're done, go back to "Panels > Perspective >" and select your work camera
Now parent constrain the camera, which I have named "facialCam_Camera", to the locator placed in front of Bishop's head.
And that's it! You should now have a camera that will follow your character's face no matter how he moves! You even have the ability to control and reposition the camera by manipulating the facialCam_Control locator in front of the face. Plus, by freezing the transformations of the locators, all you need to do to reset the camera is zero out the attributes.

This is great and all, but it still doesn't solve the speed issue if your computer can't quite handle the shot or if the scene just has too much in it. That's where isolating selected objects comes in handy.
Isolating Objects
The first thing we'll need to do is make it so we can select the geometry of the rig, which you can do 2 ways:
- Select the layout curve of the rig, hit the right arrow key, and set the "Geo Display" attribute from "referenced" to "normal"
or
- Right click on the "Prefix" button on the AM shelf and select the rig you want to select. Then right click on the "Viz" button and select "Editable"
Now that we can select our geometry, we need to figure out what we want to isolate. In Bishop's case, there are three categories of objects that I like to isolate.
Required
These are the objects that you will need to be able to actually do any lip sync and facial animation. They are: the head, teeth, eyes, and tongue.
Optional
This will be all the extra objects that, while not necessary to facial animation, give your character personality or may influence how their face would react, such as ears, hair, accessories, cigars, eye patches, etc..
Control Curves
While it's not necessary to have the control curves visible in the Facial Camera, I personally find it makes animating some things easier, such as the arcs of the mouth.
Let's start isolating some objects. To begin with, you'll want to have both a work viewport and your Facial Camera viewport open.
In the work viewport, select all the required objects as well as any extra ones you'd like to have visible. In Bishop's case, you can select most of the required objects by selecting the head geometry and hitting the up arrow key.

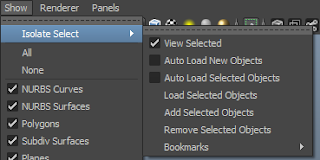
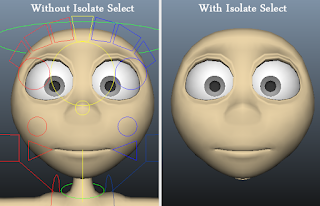
Now in the Facial Camera viewport, with the objects still selected, go to "Show > Isolate Select > View Selected". This will make it so only the currently selected objects are viewable in the viewport, making things a lot easier for the computer to handle.
To add to or remove objects from the viewport, simply select the object and under "Show > Isolate Select" choose, "Add Selected Objects" or "Remove Selected Objects".
Back to Bishop, you may notice that we don't currently have his teeth visible. To add them in, open up the outliner and in the filter input field, type "*teeth*" with the asterisks and work your way down the hierarchy until you find the teeth geometry.
Alternatively, you can use this mel script to select the teeth:
select -r
bish001_hi_C_top_teeth
bish001_hi_C_bottom_teeth ;
Simply add any prefix you may have to the beginning of each object, for example, if your rig has a prefix of "Bob_", the script would be;
select -r
Bob_bish001_hi_C_top_teeth
Bob_bish001_hi_C_bottom_teeth ;
Then in the Facial Camera viewport, hit "Show > Isolate Select > Add Selected Objects"
You can keep doing this until you have everything you want showing in the viewport.
Once you're all done, you can save the current selection by going to "Show > Isolate Select > Bookmarks > Bookmark Current Objects > options". You can then name your bookmark and hit ok. With this bookmark, if the facial camera ever reverts back to showing all objects, you can simply select the bookmark and it will isolate all the objects again.

With this you can have a camera that only shows the characters face, making it much faster to scrub through the timeline. It also makes it easier to focus on the facial acting when you don't have the background whizzing by as the camera follows the face.
One thing that can be annoying when working in a facial camera is that you won't be able to easily pick the eye controls from the viewport. Luckily you can always use the AM GUI picker to select them or if you're using another rig that doesn't have a picker, you can always create custom buttons on the shelf to select the eye controls. I wrote a tutorial covering how to do that here: Mel Scripts
A word of warning: even though a facial camera makes things much easier to animate, you always, always want to keep an eye on the camera you will be playblasting from. If you don't, you will most likely get animation that looks great from the facial camera but does not read whatsoever in the final camera.
I hope that this is helpful to you and once again, if you have any comments, suggestions, or questions, feel free to contact Cameron or me by email, Skype, or pm.

No comments:
Post a Comment