the initial movement. While there is no super secret ninja method
of getting it done easily, (if there is, which ninja clan do I
have to join to find out?) there are ways you can make it easier
for yourself.
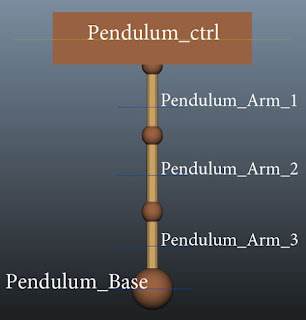
Since the basic premise here is to keep each section in place as
the one above it begins to move, what we need is a way to mark
where the section was in the previous frame. And for that,
locators work like a charm!
Create 2 locators by going to Create > Locators
Scale them up so they are about as tall as the pendulum and
position them to the right or left edge of the pendulum balls,
one against the smaller balls and the other by the large ball.
If the pendulum is at it's default position (the way it was when
you first opened the file) the first locator should be at around
a Tx 0.62 in the front camera or Tz 0.62 in the side camera.
The second should be at a Tx or Tz of 1.228.
We've now have our placeholders but if you are using the default
gradient background for Maya, you may find the locators a bit
hard to see. So let's brighten them up!
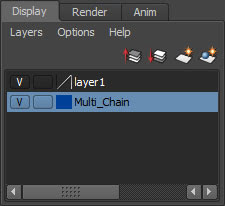
- Select both locators and in the Layer Editor, go to
"Layers > Create Layer from Selected" - Then change the color of the group by clicking on the icon beside the layer's name
- Choose a nice bright color, like bright red, and now
you've got locators that can actually be seen!
Now on to the animating! This is just an example of how to get
the pendulum to drag as it starts to move. It will all depend
on the speed and weight you want in the pendulum so be sure
experiment.
Frame 1 - Everything is in line as the pendulum hasn't started
to move yet (whew, that was hard)
Frame 2 - The Pendulum_ctrl will start to move forward. The rest
of the pendulum balls should stay lined up to the locators. To do
this, just rotate Pendulum_Arm_1 back so the ball is lined up with
the locator. You'll then need to counter animate Pendulum_Arm_2 to
keep everything straight. A neat tip I was told is to take the
rotation value from Arm_1, multiply it by -1, use ot as the rotation
value for Arm_2 and everything should line up. It's also a good idea
to frame by frame through the dragging motion to make sure you aren't
getting any pops or backwards movement in the arms.
Frame 3 - Pendulum_ctrl will keep moving forward but this time,
it's Arm_1 is starting to come along. Rotate Arm 2 to try and
keep it as lined up as possible to the locator and counter rotate
Arm_3 to keep it somewhat straight.
Go all the way down to the Pendulum_Base using this method
and you should get a nice feeling of drag to your pendulum.
Now depending in how fast the pendulum starts to move, it may
take more or less frames for the pendulum to drag so be sure to
fine tune it to your animation needs. Just keep in mind that the
idea behind this is to keep the pendulum arms from moving backwards
from the locators and giving a floaty feeling to the animation.
If you find the locators are getting in your way, another method is
to apply ghosting to the pendulum, allowing you to see where each
joint was in the previous frame and use that to line things up.
To turn on Ghosting, first select what you want to ghost, either
the entire pendulum or an individual ball of the pendulum. Then make
the animation menu set is active by hitting the F2 key at the top
of your keyboard and go to Animate > Ghost Selected > Options
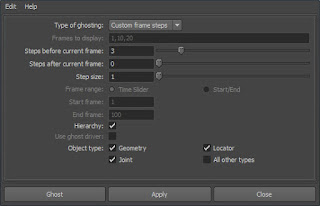
Now set
"Type of ghosting" to "Custom frame steps"
"Steps before current frame" to 3
"Steps after current frame" to 0
You should now be able to see where the selected object was
3 frames before the current frame. When you're all done,
turn it off by going to "Animate > Unghost All".
Ghosting is also a fantastic way of seeing how the arcs and spacing
are looking in your shot. If you play with the settings, you can get
ghosting that will help in all sorts of situations. Just watch out
there aren't too many frames showing at the same time as ghosting
does take a lot of resources and can bog down your scene if overused.
Unlocking the Pendulum Rotations
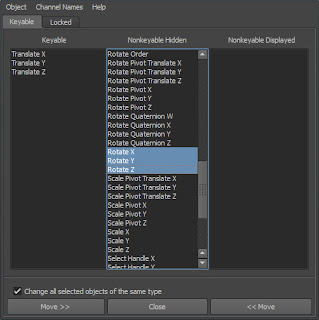
Now let's move on to unlocking the pendulum's rotation attributes. This is a great way to add
even more lift to your animation and get some
really dynamic movement throughout the whole
object. Some mentors prefer that the base not
rotate at all while other like to see it added in so be sure to ask your mentor before you unlock the
rotations.
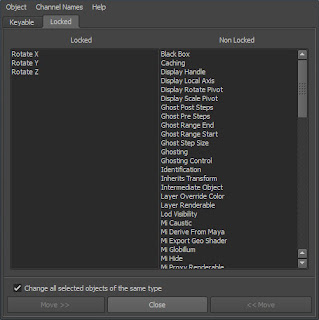
To start with, select the Pendulum_ctrl and go to
Window > General Editors > Channel Control
In the Nonkeyable Hidden middle pane, find
Rotate X, Rotate Y and Rotate Z (there are many
different versions so make sure you pick the right
one) and select them by clicking and dragging.
Hit the "Move" button in the bottom right of the window to
move the attributes to the "Keyable" section.
Now open the "Locked" tab at the top and select all 3 rotate attributes.
Then hit the "Move" button at the bottom left of the window to
unlock the attributes and you're all set to go!
Keep in mind that rotating the Pendulum_ctrl will affect the position of the pendulum underneath, so if you already have some animation applied to the arms, you will need to counter animate the first joint to get it back into place
Also, to add a bit more realism, once the Pendulum_ctrl has stopped moving, the swinging of the pendulum should still affect it ever so
slightly. This isn't a necessity but it does help give a nice touch to the animation.
As always, we appreciate any comment you have on our tips and if there is something that didn't make sense or that wasn't well explained, we would love to hear from you.
Have a fantastic Week 6!

Hey Beau, you guys are great. thanks for these tips. To add something to your tip on ghosting.
ReplyDeleteif you have a fairly dense mesh and you want to use the ghosting feature without bogging down your system, you can always parent a locator to your object and ghost that. you can move the locator around as needed, before or after parenting, to line up with specific parts of your mesh.
there is so much info on this site. Info I've been looking to clarify for weeks.
thanks again guys
Hey guys... You both are amazing... I'm constantly checking your comments in my workspace! Thanks a lot...
ReplyDeleteCheers
Amarneethi