
physics in my animation tips!", and you've got a point! I should be
giving out animation tips, not a dusty physics lecture. But as animators,
it should be our goal to study how the world works around us so that
when we go to recreate it in our work, it looks and feels alive. This
applies to physics, anatomy, and even things like how to dance the tango,
move like a ninja, or throw a baseball like a pro. But the great thing
about being an animator is that we only have to learn how it works to be
able to make it look awesome on screen, not do it ourselves!
So back to the bouncing ball. What is it that makes a ball bounce the
way it does? At it's simplest, it's a combination of 4 elements: Gravity
pulling the ball to the ground, Momentum moving it forward, Friction
slowing it down, and Density, both of the ball and the ground it's
bouncing on. In this week's assignment though, the ball and ground
density is already set for you. Either a basket ball or soccer ball
bouncing on hard ground, like concrete or hardwood floor. So with that
already out of the way, we can concentrate on the effects of gravity and
momentum!
Arcs & Contacts
I'll begin by going over the basic elements of a ball bounce; the bounce
arcs and contact points.
When a ball bounces, why is it that the arc usually has that signature
curved shape, and not a plateau or a peak? The reason for this is because
as the ball bounces, the upward kinetic energy is gradually cancelled out
by gravity, which then begins to pull the ball back down, building up speed.
That gradual motion is what gives you the dome shape of the arc, which you
can see by the red line on this drawing.

If the arc had a flat plateau to it, it would mean that the ball is somehow
defying gravity for a moment before dropping back down, and a sharp peak
would mean that the upward momentum is suddenly cancelled out and the ball
shoots back to the ground without that gradual energy shift.
Now where bounces are a gradual shift in energy versus gravity, contacts are
the sudden change in gravity turning into upward energy. This sudden change
in direction is what gives the contact it's sharp V shape , which you can see
in the above image. If the contact was a softer angle, or rounded shape, you
would lose that nice bouncy "snap".
Height Degradation & Momentum Loss
Now that we've covered the basic actions of a ball bounce, let's
move on to talking about the degradation of both height and momentum
of a ball as it bounces.
Each time a ball bounces, a part of its momentum and energy is
dissipated into the ground. This gives it less energy to bounce up
and consequently, less energy to build on the downward half of its
arc. What this means is that each consecutive bounce is going to be
lower and closer together than the previous one. It also means that
because the ball is leaving the ground with less energy than it came
in with, the ball will be higher on the frame before the contact,
and slightly lower on the frame after.
You may be wondering "But how much energy does a ball lose on each
bounce? And how do we keep it consistent?" The amount of energy a
ball looses per bounce all depends on the kind of ball it is. A bouncy
ping pong ball will only lose a tiny amount of energy, which keeps
it bouncing for a long time. A heavy bowling ball on the other hand
loses a huge amount of energy on each bounce, so it only bounces a
handful of times before it doesn't have any more energy to get itself
back in the air.
One thing to remember though is that in a perfect circumstance
(like your assignment), a ball will always lose the same amount of
energy on each bounce. We'll use our trusty basketball for this example.
A basketball loses roughly 40% of its energy in each bounce, with
means that on each bounce, the height will be 60% of its previous
height. This number is consistent. You won't see a basket ball drop,
lose 10% of its energy in the first bounce, 50% in the second, and 20%
in the third. This constant percentage is what gives a basketball that
nice dribbling effect because it just keeps bouncing in tiny amounts.
A nifty trick to visualize this is by drawing a curve running from the
starting height of the ball drop, to the peak of the last bounce, as
seen in this familiar sketch:
You can also do this with a straight line to make things easier, but
it won't give you as nice a dribble at the end. This curve starts out
a bit steep and slowly eases out into a flatter line. Each bounce between
the start drop and final bounce will touch that curve, giving you a
nice gradual height degradation. Keep in mind though that this curve
is for a basketball. Each kind of ball has a different angle and steepness
to the curve depending on how much energy it loses per bounce.
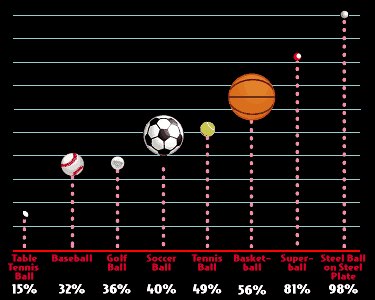
Here is a handy little chart which shows a few different kinds of balls
and their respective height percentages per bounce.
And finally, loss of momentum is quite a bit easier to handle. Momentum
is lost gradually over time due to friction with both the ground, and the
air, though air friction is very minimal. your Tx or Tz curve (whichever
you're using for the forward movement) should look a bit like the curve
I showed you earlier. It starts steep, going fast, and gradually eases
until it comes to a nice gentle stop. Unless something stops it, a ball
won't come to an abrupt stop on it's own.
Thank you for taking the time to read my post. I hope you've found these
tips helpful. Remember that these are all just guidelines for you and I
strongly encourage you to play around and experiment with different styles
of ball bounces to see how they work for yourself. It's the best and most
fun way to learn!
As always, if you have any comments, questions or suggestions, you're
more than welcome to leave a comment or send either Beau or me a
message on AM.
This is incredibly helpful, so much great info here. Thanks a bunch!
ReplyDeletethanks guys for this nice post
ReplyDeleteThanks, Cameron!!!
ReplyDeletethanks!for this information!
ReplyDeleteLovely post -- I especially like the ball/height percentage chart.
ReplyDeleteThank you excellent post
ReplyDelete