power to destroy your work, waste your time, and level entire
mountains! (Okay, that last one might be a bit of a stretch).
Before we can begin to vanquish this beast, we must ask
ourselves, what is Gimbal Lock?
Maya explains it as "a situation where one rotational axis is
placed over another, causing the two axes to lead to the same
result when animated." Basically, this means that as you are
rotating your object in the scene, there may come a time when
two of the rotation axes start to overlap, causing both of them
to rotate in the same direction. This can lead to a major
headache as you lose an entire axis of control and can lead to
odd transitions or crazy rotations when you go into splining.

But how can you tell when you are achieving Gimbal Lock?
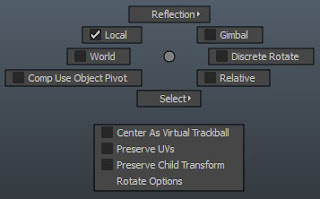
In Maya, there are 3 major rotation modes: Local, World, and
Gimbal. You can switch between them by holding down the "e" key
while in the viewport and then holding down the left mouse
button. This will bring up a hotbox allowing you to change
the current rotation mode.


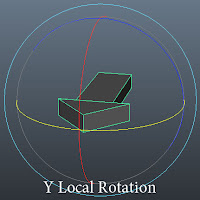
Local
This is the default rotation mode of Maya.
When in Local mode, the rotation manipulator
rings will follow the object however you rotate
it, making it one of the most useful modes.
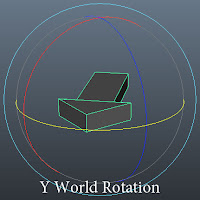
World
In World mode, the rotation manipulators will be locked to the
scene's XYZ axis, meaning that no matter how you rotate an
object, the manipulator rings will stay in the same position.
This comes in handy when you need to rotate an object parallel
to the floor
Gimbal
Here is where we finally get to see what causes Gimbal Lock.
Gimbal Mode allows you to see the rotation manipulators as Maya
sees them, giving you more precise control of the rotation
values but also making Gimbal Lock a lot easier to achieve if
you don't pay attention to the Rotation Order.

But what is this new fangled "Rotation Order"?
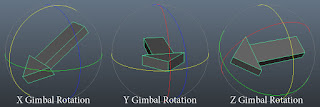
Each of the three axes X, Y, and Z, must be linked to each
other creating a hierarchy called a Rotation Order. This order
determines how each axis will affect the others. For example,
if you have a XYZ Rotation Order, it means the X axis is
"parented" to Y and Y to Z. So if you were to rotate them,
as you can see in the above image, the X axis will not affect
the others, the Y will affect the X, and the Z will affect everything.
When rotating with Gimbal mode, it's best to try to do it
reversed from the Rotation Order. For example, if I have a XYZ
Rotation Order, as the arrow does in the image, I would start
rotating the Z axis, then the Y, and finally the X. If I were
to start with either the X or Y, the object doesn't line up
with the Z axis anymore, making it harder to rotate in the
proper position.
One major difference between Gimbal and the other modes is when
you rotate using the manipulator, it will only affect the
corresponding value in the Channel box. So if you rotate in X,
the Rotate X value will change. With Local and World modes,
rotating one axis may change more than one of the rotation XYZ
channels making it harder to keep a nice smooth curve in the
graph editor.
Gimbal Lock can cause many problems in your scene, from not
being able to rotate an object properly, to making weird and
crazy things happen when you go into splined. While Gimbal Lock
is usually the suspect in these cases, it can also happen when
Maya guesses the rotation values incorrectly. Let's say you
have an upper arm with a Y rotation of 20. On the next frame,
you rotate it 10 degrees into it's next pose but thanks to
Gimbal Lock losing you an axis, Maya has to compensate and
instead of a Y value of 30, you get a weird value like 157.32
and both the X and Z channels get changed as well. Now the arm
will look fine while in stepped but as soon as you start
splining your animation, the arm will start to spin or move in
weird arcs.
Whew. That was a long winded explanation. But now that we know
what's the cause, we can learn how to fix it.
Avoiding Gimbal Lock
Sadly, there is no easy way to avoid Gimbal Lock while you're
animating. Using Gimbal mode to rotate does help, but in many
cases, it won't give you the rotation needed, especially when
it comes to hands and feet. When in Local or World mode, the
only thing you can do is be careful and watch the channels to
make sure nothing is getting strange values. You could also
open up the graph editor as you're working to see if anything
weird happens in the curves. For example, if the character's
arm is supposed to swing in a steady straight line, if a curve
in the graph editor suddenly reverses direction, it's a sign
that you've hit Gimbal Lock.
Fixing Gimbal Lock
If you hit Gimbal Lock, there are a few things you can do to
try and fix it. The first thing I usually go for is the
animator's secret weapon, the Euler Filter! This is a command
that will mathematically go through your curves and change the
rotation values to remove the Gimbal Lock without affecting how
your keys look. To use it, open up the graph editor and select
all the curves of the Gimbal Locked object. Then go up to
Curves > Euler Filter. Once it's done, it's a good idea to go
through your animation and double check that none of your keys
have been altered. Most of the time, this will clear up the
lock but unfortunately, it is not 100% effective.
In those cases, it's time to go in and do things manually! Try
to find what key or keys are Gimbal Locked, the graph editor is
a great place to find out where it's happening, and reset the
rotation values of the locked object. Now reposition the object
while making sure it doesn't lock again. Changing the rotation
mode can help make things easier.
If you have an extreme case of Gimbal Lock throughout an entire
section of animation that refuses to go away, it's time to
bring out the big guns! Let's say you have a shoulder that is
stuck in gimbal lock from frame 70-80, making it next to
impossible to get a nice clean arc throughout the swing of the
arm. One method I found to quickly get everything working again
is to track the arc of the elbow and wrist with the AM Arc
Tracker, then nuke out all the rotations of the problem joint,
the shoulder in this case. You can do that easily in the graph
editor. Now you can start rotating the shoulder back into
place, using the previously created arcs to line up the elbow
and wrist. Be sure to check or use the Gimbal Mode from time to
time to make sure you the same issue isn't happening again.
This should get your animation back up to speed quickly and if
you were careful, get rid of all the gimbal lock.
For more information on Gimbal Lock, you can check out these videos.
I hope that this was easy enough to understand (and not too long).
If not, feel free to send a PM or comment. Also, if you are
having a specific Gimbal issue that wasn't covered here, let us
know and we'll try to help out.
Have a great week!

No comments:
Post a Comment