We'll begin with a scenario.
Let's say you have a fireman that just heard the fire alarm go off and needs to spin and slide down a pole to get to the fire trucks. It may seem easy enough at first, but if you're working with FK limbs, having to reposition your character each time you rotate him around so that his hands stay on the pole can be very tiresome. IK brings it's own set of issues as the IK limbs would need to be repositioned separately from the body to avoid rotation issues or popping.
Luckily, to make it much easier, there are some fairly simple techniques which we learned from the amazing Kevin Freeman. He showed us 5 different methods to get a character to rotate around an object easily, and although the last 2 methods are using tools that you'll get in either Class 6 or Animals and Creatures, I thought I should include them as well.
For the examples, I'll be using the fireman scenario that I mentioned above, but these methods can work with just about any situation where you need a character to spin around a spot.
Method 1 - Animation Manipulator
| | This is probably the simplest method in the list as it is basically just moving your character around as usual.
- Create a locator by going to "Create > Locator"
- Place the new locator in the center of the object or place you want your character to rotate around. For example, if you use the fireman example from above, you would place the locator in the center of the pole. An easy way to do this in most cases is to select the pole (or whatever object you have) then the locator and create both a point constraint and orient constraint with "Maintain offset" unchecked for both. This will snap the locator to the center of the object. Then open up the outliner and under the locator, delete both of the constraint nodes. (the ones with a red !)
- Turn on the Animation Manipulator from the AM shelf.

"// Warning: Anim Manipulator mode is:1" will pop up in the help line at the bottom of the Maya window letting you know it's been turned on.
- Next, select your character's body control which would be the triangular control at the hips if you're using Bishop or Stewie, then add any active IK controls to your selection, followed by the locator. By selecting the locator last, it will give you the ability use it as a pivot that all the other controls will rotate around.
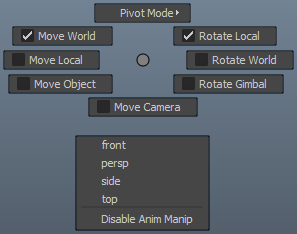
- Hold down the "e" key and click and hold the left mouse button. This will bring up the Animation Manipulator menu. Make sure "Rotate Local" is checked and that the Pivot Mode is set to "Last selected"
You should now be able to use the rotation manipulator to rotate the entire character around while using the locator as the pivot. At the time of writing this, if you are using Maya 2013, there seems to be a glitch that requires you to keep holding down the "e" key and middle mouse dragging on the rotation manipulator for the tool to work. I'm not sure what exactly is causing that issue, but Kevin Freeman is working on a fix.
All that's left to do now is to set keys every few frames while rotating the character around and down the pole until he reaches the bottom. Once you've got the movement down the pole how you like it, you can then start properly animating the character.
The downside with this method though is that it can be a bit hard to get the spacing of both the rotation and translation during the spin just right without a lot of tweaking and arc checking. Plus, as it uses a tool from the AM shelf, if you end up in a studio that doesn't allow external tools, you'll end up having to use another method. |
Method 2 - Constraints
| | This method is a bit more complex but one thing it has going for it is that it uses tools which are already built into Maya, removing the need to rely on any 3rd party tools. It's also a lot easier to get the spacing for the rotation and translation of the spin working exactly how you want.
When working with the constraint method, it's important to know the time range of the spin. In our case, let's say the fireman grabs onto the pole at frame 40 and stops at frame 70.
- Animate the locator going going down the pole (from frame 40 - 70 in our example), having it rotate as many times as you'd like the fireman to spin around the pole. This can be done later, but I prefer starting with this as having it animated will help me see if my constraints are working properly.
- Parent constrain the body and any active IK controls to the locator one at a time by selecting the locator then one of the controls and going under Constrain > Parent > options. Make sure Maintain offset is checked and hit apply. This will keep the options window open so you can select the locator and another control and hit apply again till the body and IK controls are all constrained.
- Go to the frame before the character starts their spin, in this case it would be frame 39 and set a key on the body and IK controls. This will create a Blend Parent attribute in the channel box if there wasn't one there already. Make sure it's set to 0.
- Move ahead one frame to where the character will start their spin, 40 in this scenario, and set another key on the body and IK controls, this time setting the Blend Parent to 1 for all of them. This creates a switch, turning on the constraints.
- If you haven't done so already, animate the locator rotating and translating to get the character spinning around the object.
- If you notice any part of your character rotating or translating in odd ways in relation to the locator, check to see if the curves in the graph editor for the hips and IK controls are set to either stepped or linear as any overshoot in the curves can cause odd movements.
- Once you've got your character spinning around the pole the way you'd like, which can be a bit of a pain seeing as he's stuck in one pose at the moment due to the constraints, select the body and IK controls once again.
- Set a key on the frame on which the spin ends and on the frame after, 70 and 71 in our case. On the frame the spin ends (70), make sure the Blend Parent attribute is still set to 1, and on the frame after (71) set it to 0, switching off the constraints.
In our fireman scenario, we now have the character running up to the pole, sliding and rotating down, then running to the fire truck. This is all well and good, but with the constraints on during the spin, all your left with is your character stuck in one pose as he's going down the pole. Luckily there is a simple tool that can help transform the constrained poses into keyed poses.

- Pick all the constrained objects, which would be the body and IK controls.
- Go to "Edit > Keys > Bake Simulation > options".
- Make sure the following settings are set:
hierarchy = selected
time range = Start/End
Start time = the frame the constraints are turned on. 40 for this example
End time = the frame before the constraints are turned off. 70 for this example
sample by = how far apart you want the keys to be. You could set it to 1 and have a key on every frame but that's a bit excessive. I find a key every 4 frames to be a good starting point. You don't want to have too few keys though, as your character may not spin around the object properly.
- Make sure "Keep unbaked keys" is on that way you don't lose your previous keys
- Hit "Bake"
It's often a good idea to save before baking as I've found that it will sometimes freeze Maya.
Baking your animation will go through your constrained section and set keys on the all the selected controls, allowing you to delete the constraints while still keeping your animation intact and also having the ability to pose and animate the character during the spin.
To delete the constraints quickly, pick locator and delete it. This will remove any constraints related to that locator and allow you to get animating. |
Method 3 - The Body Pivot Node
| | The idea behind this one is fairly simple, set any IK controls to FK and all you'll need to worry about is rotating the body, which just so happens to have it's own method of rotating around an object. The Body Pivot node.

- Set a key on the frame your character will start to spin around the object and on the frame before. That would be frame 39 and 40 for our example.
- On frame 40, set any IK limbs to FK
- Use the FK/IK Snap tool to get the FK limbs into place.
- Select body node and hit the down arrow twice to select body pivot node. This node can be used to rotate the body around any point you want by simply translating and then rotating it.
- Move the Body Pivot node to the center of the object or area you want to spin around.
- Animate the Body Pivot rotating around the pole to get the character spinning.
If you need to animate him going down or up as well, I would suggest using the Cog control which you can find in the center of the character's hips by going into wireframe mode (the 4 key). It's the small triangle control curve. The reason I prefer to use this when animating with the Body Pivot node is the main body node gets offset as you rotate with the Body Pivot node, causing unpredictable animation and making things very hard to control.
Once the character is finished spinning, set a key on the frame he finishes and the frame after, 70 and 71 in our example. On the frame after, reset the Body Pivot node and Cog back to 0, that way you will be able to keep animating with the body control. This will require a bit of repositioning, but compared to having to reposition the character during the entire spin, it's not all that difficult. |
Method 4 - Relative Pose Tool (Class 6 or A&C)
(terms may not be 100% correct as I haven't had a chance to use all the tools. If someone has the proper terms, please let me know as I'd like to get it correct.)
| | The Relative Pose tool gives you the ability to set up a temporary relationship that doesn't use constraints. This gives you a lot of control as you can go back to a pose and reorient it easily without having to redo any constraints.
As in Method 1, create a dummy locator and place it in the center of object or area you want to spin around. The exact position doesn't matter as long as it's in the center.
- Open the Relative Pose tool.
- Give the new pose a name. For this example, we'll use "swing"
- Select the locator first as it's the center, then the body (the triangular one) and the IK controls
- Hit "Create Pose"
- Now rotate and move the locator down the pole.
- Select the "swing" pose in the Relative Pose tool and hit "apply pose". This will adjust all the controls associated with that pose to adjust themselves in relation with the locator, allowing you to easily get the character spinning around the pole by adjusting the locator and hitting apply pose ever few frames.
To make getting the spacing right even easier, you can animate the locator then go every few frames and apply the poses that way. You can also go back to any previously applied poses and reapply them to adjust the animation.
Once you're done applying the poses, set your time range to only include the applied poses, 40 - 70 as per our example. In the fireman example, that would be from frame 40-70. Then back in the Relative Pose tool, select the pose and hit "bake poses" so that each control is now keyed and you continue animating your shot. |
Method 5 - Layout Node with Marking tool (Class 6 or A&C)
(terms may not be 100% correct as I haven't had a chance to use all the tools. If someone has the proper terms, please let me know as I'd like to get it correct.)
| | This one takes a bit of forethought. Before animating your shot, place the layout node in the center of the object or area you want your character to spin around. If you've already started blocking in your shot, you can use something like the Relative Pose tool or Nudge Tool to move the layout node, then place the character back into position.
By using the layout node, it makes having the character slide and rotate down a pole a snap as all you need to do is animate the layout node and you're done! The only disadvantage is that you'll need to counter animate everything when it comes time to make adjustments. Luckily you can use the Marking Tool to get the layout node back out of the picture while retaining the animation. To do this,
- Animate the layout node going down the pole or spinning around whatever object you need.
- Key the hip and IK controls every few frames where you would like some keys. Every 4 or so frames works pretty well.
- Set the time range to only contain the spinning. In our fireman example, that would be from frame 40-70.
- Open the Marking tool and use it to mark the hips and IK controls.
- Select the layout node and delete all the animation from it.
- Select all marked nodes, which would be the body and IK controls.
- Using the Marking Tool, align the nodes to the markers.
You should now have your character keyed and ready to be animated through the spin. |
These aren't the only ways to get a character to spin around an object though, and if you have an entirely different method that works for you, fantastic. You can also mix and match methods as well, for example, setting all the limbs to FK but instead of using the body pivot, constraining the hip to a locator.
I hope that was helpful and as always, if you have any questions, comments, or suggestions on future tips you'd like to see, feel free to contact us anytime by Skype, pm, or leaving a comment in our workspaces.


Great tips! Thanks!
ReplyDelete