The first thing you should do before any referencing or importing is to change the name of the rigs you're using. I'll go over how to do this shortly. Changing the names helps avoid import and reference issues, as well as any conflicts when you're keying controls or modifying the rigs.
This tip assumes you are using the Bishop rig. If you use another rig, such as the Malcolm or Morpheus rigs, which are both really good, some of the steps may not work properly.
Importing
When importing a customized Bishop rig into your shot, there is a certain order you need to take so the extras can be assigned and the rig can be renamed.
First, open your Bishop or equivalent rig. Next, assign the extras. If you're not sure how to go about doing this, you can learn all about it here: Assigning Bishop 2.0 Extras. Edit and get your character ready with all the props, textures, and materials you need, then save them as a .mb file. This is important as the upgrade tool you'll be using later doesn't support .ma files. Now create your second character, following the same steps as before.
The next step is to create a new scene which will act as your final work scene, complete with characters, props, cameras, and animation. With this new file saved out, go to the AM shelf and open the upgrade shelf tool.

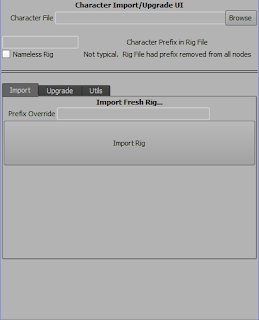
Set the rig prefix to bish001, which is what your Bishop rigs are named by default. Once you have the rig prefix put in, set what you'd like the new prefix to be in the Prefix Override box. This is where the simple naming convention we mentioned earlier comes in to play. Then just hit the Import Rig button and you're character will be imported into your scene. To import your second character, follow these same steps again, choosing a different prefix to name your character. Voila! Your two-character shot is ready to go!
If you need to edit or change your rig later, you can use the upgrade tool to do it. Upgrade Tool How-To
Referencing
Referencing characters into a scene is something that you will probably see fairly often during your career, because of the small work file sizes it creates, and the fact that you can very easily go back to the referenced character and change, edit, or update them, which will update your animation without having the hassle of reimporting the character and doing an anim transfer. Studios also like to use referencing because there are times when you may start animating and not yet have the final version of the rig. Once the rig is complete though, it's an easy matter of updating the reference and getting the final character into your shot.
When using references, there are a few things to keep in mind. Due to the nature of referencing, it is possible for it to become corrupted while you work without your knowledge. If this happens, not only can you lose your last save file, but also any incremental saves since the corruption happened. To prevent this, be sure to restart Maya every 2-4 hours; that way you can catch the corruption before it affects too many of your saves and you don't lose as much work. That said, it's easy to get lost in your work and lose track of time. If something like this happens, and you end up losing a large chunk of animation, don't panic. There may be a way to save it. Check out this post if you ever run into a corrupted reference file: Restoring Corrupted Reference Files
First, open your Bishop or equivalent rig and begin assigning the extras. Again, if you're unsure on how to do this, you can learn all about it here: Assigning Bishop 2.0 Extras. Edit and get your character ready with all the props, textures, and materials you need, then save them as a .mb file. This is important because the upgrade tool which you'll be using shortly doesn't support .ma files. Now, make a new scene and use the upgrade tool to import your character, then save the file. This will be your reference character file. Then just repeat these steps again for your second character.
With the characters created, it's time to reference them into our shots. Either create or open your shot file, go to File > Reference Editor.

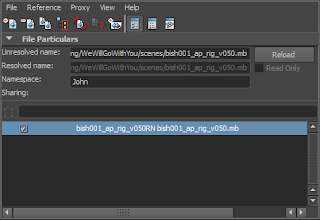
Once you have the reference editor window open, in the editor window, go to File > Create Reference. Before opening your character files though, first make sure that the namespaces option is turned on.

Now just browse for the character file you created earlier and open the file. Once the file is open in the reference editor, you can type in any namespace you like for your character reference, but I prefer to keep it short like c1 (for character 1). You'll also want to make sure the namespace is different for each character your reference in to prevent conflicts. Then do the same thing for the other character to have your two-character scene ready to go.
For a video on how to reference in your characters, be sure to check out this link: File Referencing
Working with Multiple Characters
When you're working with multiple characters in a shot, there are a couple of AM tools that can really help out to keep things from becoming a mess of controllers and selections.
The first tool is called the Prefix Picker. Using this tool can help you keep your selections organized, especially when doing mass selections or when two characters are too close together to make a selection over the controllers.
To use it, open up the Prefix tool and type in the name of the character you would like to select. You can then click on the various options to select different controllers. You can also Right click on the Prefix tool to quickly pick between rigs.
The other tool you have available is called the GUI Picker.
Thank you for taking the time to read my post. I hope it's been helpful, and as always, if you have any comments, questions or suggestions, you're more than welcome to leave a comment or send either Beau or me a message on AM.

Just starting Class 5 and this tip was super helpful! Thanks!
ReplyDelete